

I once faced a week so packed with meetings, errands, and after-school activities that dinner felt like a dreaded chore. That’s when I looped the Japanese Katsu Bowls recipe into my meal plan—it was a total game-changer. This Japanese Katsu Bowls recipe fit perfectly into my organized routine, giving me an easy way to serve up a filling, flavorful dinner without last-minute chaos or rushed grocery runs. The prep-ahead and batch-cooking possibilities meant I saved almost an hour on weeknight cooking, which I put toward catching up on reading and relaxing with family.
What made this Japanese Katsu Bowls recipe so reliable was how adaptable it is to real life. The crispy panko breading on the fried pork cutlet or chicken katsu bowl pairs perfectly with fluffy Japanese rice bowl bases and the tangy, rich tonkatsu sauce that brings everything together. Plus, the ingredients double up nicely across the week, so I wasn’t buying extras that would just waste space or money.
For busy cooks like us, this isn’t about making complicated meals but planning smart and finishing with delicious results. I’m excited to share how I carve out time and prep for this Japanese Katsu Bowls recipe so it feels more like a treat than a hassle. If you want a strategic way to add a reliable, tasty, and manageable meal to your weekly line-up, this is it. Let’s dive into how this fits seamlessly into thoughtful meal prep without stress or scrambling.
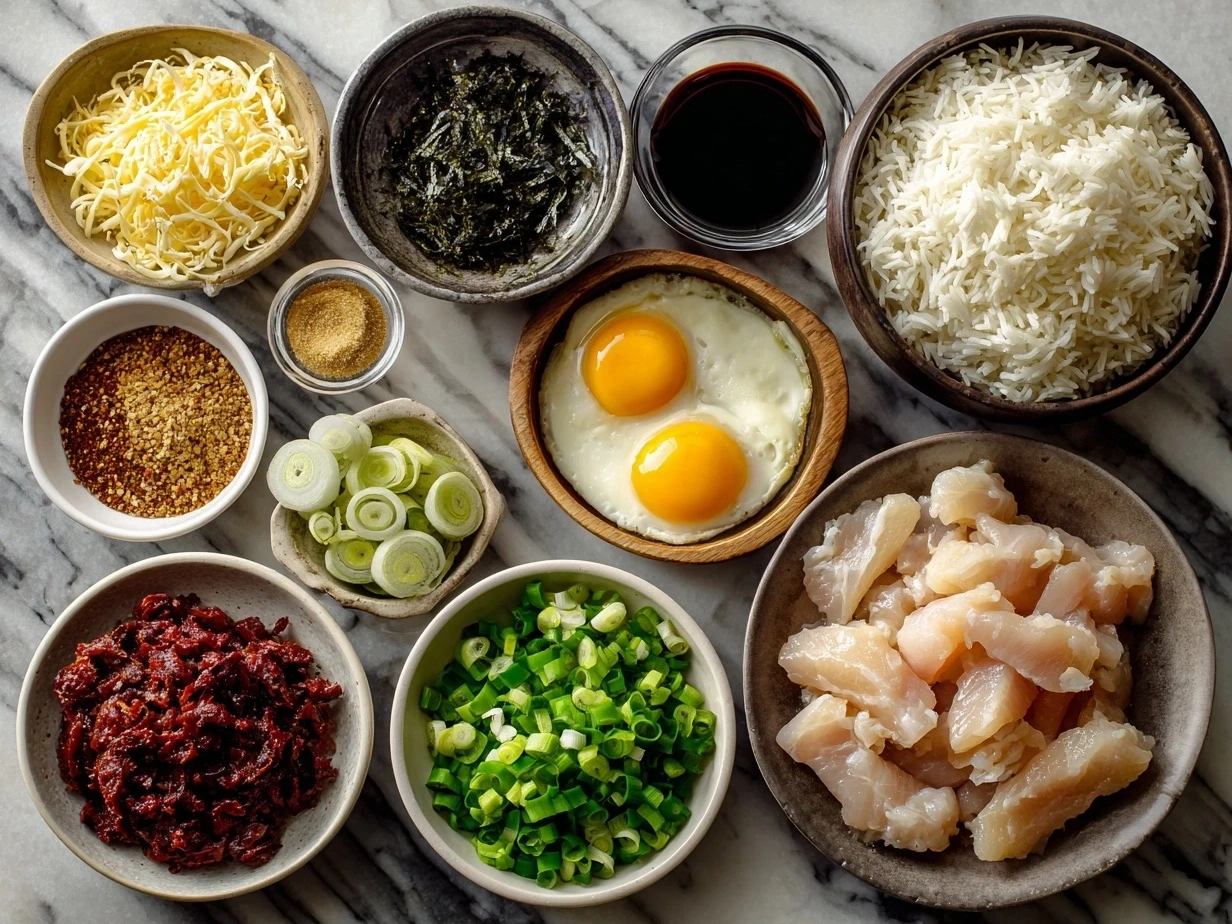
Your Shopping List:
When planning your Japanese Katsu Bowls recipe, start with ingredients that work smart in your kitchen and pantry. Here’s what I use every time:
- 1 lb boneless pork loin or chicken breasts (I choose pork or chicken for this Japanese Katsu Bowls recipe because both store well, and they freeze nicely if you prep in batches.)
- 1 cup panko breading (This crispy Japanese-style breadcrumb is the star of your chicken katsu bowl or fried pork cutlet’s coating. I usually buy it in bulk to keep on hand.)
- 2 large eggs (For the breading dip—easy to store and multi-use for other recipes in the week.)
- 1 cup Japanese short-grain rice (Perfect stickiness for Japanese rice bowl bases; I often cook extra and freeze portions for quick assembly.)
- 1/2 cup tonkatsu sauce (Store-bought versions save time; you can find these in Asian markets or online. I keep a bottle stocked for multiple uses.)
- Salt and pepper to taste
- Vegetable oil for frying (I pick an oil with a high smoke point like canola for the fried pork cutlet.)
- Optional: shredded cabbage or sliced green onions (Great for topping your Japanese katsu bowl and adds fresh texture.)
Group these together when shopping—it’s best to grab your meat and rice in one aisle, then the panko breading and tonkatsu sauce from the Asian foods section. This grouping saves time and keeps your shopping trip focused.
Several of these ingredients pull double duty, fitting smoothly into other meals like quick stir-fries or salads during your week. For example, leftover panko breading works well for chicken nuggets later, and tonkatsu sauce brightens up sandwiches or dipping sauces.
If you want to save more time, you can buy pre-cut pork loin or even pre-breaded chicken katsu from the freezer aisle. Just double-check they use panko breading to keep that authentic crunch.
Storing your ingredients strategically helps keep your weekly rhythm smooth. Japanese short-grain rice, once cooked, freezes well in single servings. Pre-portion the panko breading in reusable bags if you plan to batch cook multiple Japanese Katsu Bowls recipe servings.
The Game Plan:
For efficient results, your Japanese Katsu Bowls recipe will take about 30 to 40 minutes from start to table. Here’s how to break it down into a simple system that fits your busy week.
- Rice first: Rinse the Japanese rice under cold water until the water runs clear. Set it to cook in your rice cooker or pot — this usually takes about 20 minutes. While this is going, you can prep your protein.
- Prep the meat: Pat your boneless pork loin or chicken breasts dry, then season with salt and pepper. This step ensures even flavor, so don’t skip it.
- Set up your breading station: In one bowl, beat the eggs. In another, pour the panko breading. Dip your meat pieces into the egg wash, then coat both sides firmly in panko breading. This method creates the crispy exterior that defines the Japanese Katsu Bowls recipe experience.
- Fry time: Heat vegetable oil in a large skillet to medium-high—around 350°F if you want to be precise. Fry your breaded cutlets for about 3-4 minutes per side until golden brown and cooked through. Tip: Don’t overcrowd the pan, or you’ll lose that crispness.
- Drain and rest: Transfer the fried pork cutlet or chicken katsu bowl pieces onto paper towels to drain excess oil. This keeps your dish from getting greasy. While that cools, you can move to preparing any toppings or your next meal’s ingredients.
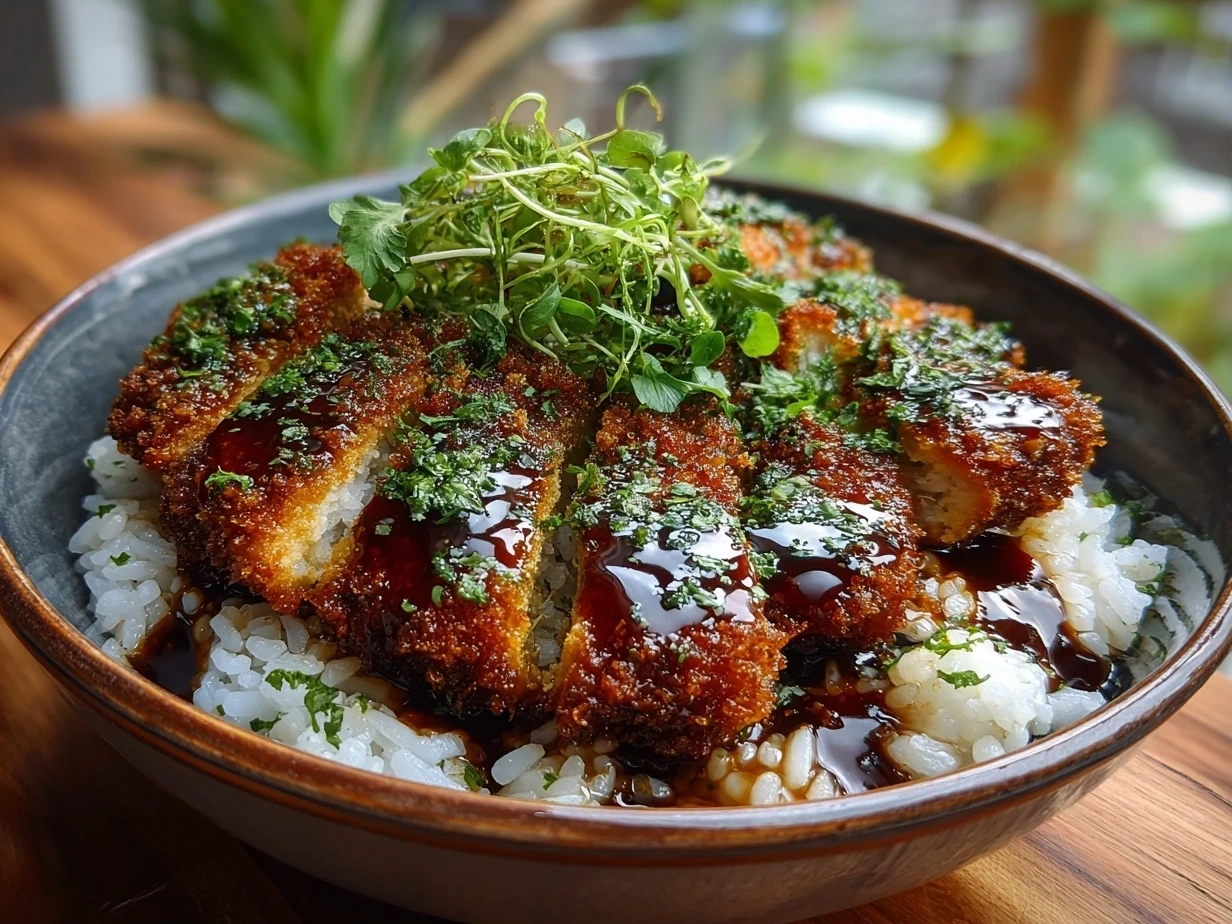
- Assemble the bowl: Start with a generous scoop of warm Japanese rice bowl in your serving dishes. Slice your katsu into strips and arrange atop the rice. Drizzle tonkatsu sauce across the meat for that unmistakable savory-sweet finish. Add shredded cabbage or green onions if you like for crunch and brightness.
If you’re planning this Japanese Katsu Bowls recipe ahead, here’s a tip: fry your cutlets and store them in the fridge for up to two days, then reheat in the oven at 350°F to refresh the breading. The rice can be pre-cooked and portioned in the freezer, so assembly takes just minutes on hectic nights.
From repeating this meal in my rotations, I’ve learned that the key to success lies in multitasking. While the rice cooks, prep your protein and set up your breading station. After frying, use that window to chop quick sides or even start soaking rice for tomorrow’s meal.
Smart Serving & Meal Planning Ideas:
This Japanese Katsu Bowls recipe is a weekly staple for good reason. It fits effortlessly into your meal plan and pairs beautifully with sides that use ingredients you already have on hand.
Pair it with steamed broccoli or a simple cucumber salad for fresh contrast. Both options are easy to prep while your rice cooks, saving time on weeknights. Using shredded cabbage as a topping also doubles as an easy side.
Planning tip: make the katsu in slightly larger batches to have leftovers for lunch the next day or sandwiches—adding an extra dash of tonkatsu sauce turns it into a new meal. This flexibility makes Japanese Katsu Bowls recipe ideal for busy households with variable schedules.
Portion planning is simple, too. One piece of fried pork cutlet or chicken katsu bowl per serving with about a cup of rice satisfies most appetites, but you can scale up easily for families or guests.
If you want variations, swap chicken for pork or switch up the sauce with homemade tonkatsu inspired by this recipe from The Woks of Life’s Katsudon Japanese Pork Cutlet and Egg Rice Bowl. For a leaner option, check out Chicken Katsu Don – Chicken Cutlet Rice Bowl for another version of the Japanese rice bowl.
Planning & Prep Questions
1. How far ahead can I prep this Japanese Katsu Bowls recipe?
You can bread and fry your katsu cutlets up to two days in advance. Keep them in an airtight container in the fridge. Just reheat in the oven or air fryer before serving to bring back that crisp.
2. What’s the best make-ahead strategy for Japanese Katsu Bowls recipe?
Cook your rice earlier in the day or batch-cook on the weekend and freeze in portions. Fry the cutlets the day before or even on Sunday night, so assembly is truly quick.
3. Can I freeze the fried pork cutlet or chicken katsu bowl for later?
Yes. Wrap each piece tightly in plastic wrap and store in freezer bags for up to a month. Thaw overnight in the fridge and reheat in the oven.
4. How do I incorporate this Japanese Katsu Bowls recipe into my weekly meal plan?
Pair this Japanese rice bowl with simple veggies for Tuesday when you might want a quick yet satisfying dinner. Use leftovers creatively for lunch wraps or salads later in the week.
5. Is panko breading the only option?
Panko provides that essential crunch, but if unavailable, you can try crushed cornflakes or regular breadcrumbs. Expect a slight change in texture though.
6. What oil works best for frying?
Vegetable or canola oil with a high smoke point maintains the integrity of the fried pork cutlet. Olive oil isn’t ideal here as it smokes quickly.
7. Any tips for making chicken katsu bowl instead of pork?
Yes, chicken breasts slice thin and marinate briefly to keep them juicy. The same breading and frying process applies perfectly to chicken katsu bowls. For extra flavor, check Tiffy Cooks’ Chicken Katsu Don.
Planning Takeaways
This Japanese Katsu Bowls recipe has earned a permanent spot in my meal planning because it’s reliable, delicious, and fits into my schedule without added stress. It’s a rotation regular that satisfies everyone at the table and uses ingredients that pull double duty week after week.
Strategic Japanese Katsu Bowls recipe Tips:
– Prep your rice and protein ahead to cut cooking time in half on busy nights.
– Double or triple the batch and freeze portions for easy weeknight meals.
– Use versatile ingredients like panko and tonkatsu sauce across other meals for cost efficiency.
Some planning variations I’ve tried include switching from pork to chicken to keep it fresh, adding steamed veggies for dinner on slower nights, or turning leftovers into katsu sandwiches for a quick lunch fix. During the busiest weeks, the make-ahead approach works best: fry on Sunday and assemble on demand.
This Japanese Katsu Bowls recipe simplifies dinner planning because it’s predictable yet flexible, so adapting it to your schedule feels natural. If you want a reliable meal to back you up all week, this one’s a keeper.
For a deeper look at fried pork cutlet options, check out tonkatsu recipes featuring crumbed pork cutlets shared in this Facebook group Tonkatsu recipes featuring crumbed and fried pork cutlets. Combining these resources creates a strong rotation for easy, satisfying meals.
Happy planning and cooking! This Japanese Katsu Bowls recipe is ready to fit your busy life, helping you cook smart and eat well with less stress.
Japanese Katsu Bowls recipe
Discover the crispy and savory delight of Japanese Katsu Bowls, featuring breaded cutlets served over steamed rice with a flavorful sauce and fresh vegetables.
- Prep Time: 15 minutes
- Cook Time: 15 minutes
- Total Time: 30 minutes
- Yield: 2 servings
- Category: Dinner
- Method: Fried
- Cuisine: Japanese
Ingredients
- 2 boneless chicken breasts or pork cutlets
- 1 cup panko breadcrumbs
- 1/2 cup all-purpose flour
- 2 eggs, beaten
- 2 cups cooked white rice
- 1 cup shredded cabbage
- 1/4 cup Tonkatsu sauce
- Vegetable oil for frying
- 2 green onions, sliced
- Sesame seeds for garnish (optional)
Instructions
- Slice chicken breasts or pork cutlets into even pieces. Season with a pinch of salt and pepper.
- Set up a breading station with flour, beaten eggs, and panko breadcrumbs in separate bowls.
- Dredge each piece first in flour, then dip in egg, and finally coat evenly with panko breadcrumbs.
- Heat vegetable oil in a skillet over medium-high heat. Fry the cutlets until golden brown and cooked through, about 3-4 minutes per side.
- Remove and drain on paper towels.
- Divide cooked rice into bowls. Top with shredded cabbage, then place the fried cutlets on top.
- Drizzle Tonkatsu sauce over the cutlets and garnish with sliced green onions and sesame seeds if desired.
- Serve immediately and enjoy your flavorful Japanese Katsu Bowls.
Notes
For a lighter version, try baking the breaded cutlets instead of frying. Adding a soft-boiled egg on top makes a great addition.